Wireless-G Router
WGR614v9 Reference
Manual
NETGEAR®
NETGEAR, Inc. 4500 Great America Parkway Santa Clara, CA 95054 USA
202-10308-01 May 2008
© 2008 by NETGEAR, Inc. All rights reserved.
Technical Support
Please refer to the support information card that shipped with your product. When you register your product at http://www.netgear.com/register, we can provide you with faster expert technical support and timely notices of product and software upgrades.
NETGEAR, INC. Support Information Phone: 1-888-NETGEAR, for US & Canada only. For other countries, see your Support information card. E-mail: support@netgear.com North American NETGEAR website: http://www.netgear.com
Trademarks
NETGEAR, the NETGEAR logo, ProSafe, and Auto Uplink are trademarks or registered trademarks of NETGEAR, Inc. Microsoft, Windows, Windows NT and Vista are registered trademarks of Microsoft Corporation. Other brand and product names are registered trademarks or trademarks of their respective holders.
Statement of Conditions
In the interest of improving internal design, operational function, and/or reliability, NETGEAR reserves the right to make changes to the products described in this document without notice.
NETGEAR does not assume any liability that may occur due to the use or application of the product(s) or circuit layout(s) described herein.
Wireless Communications
Maximum Wireless signal rate derived from IEEE Standard 802.11 specifications. Actual throughput will vary. Network conditions and environmental factors, including volume of network traffic, building materials and construction, and network overhead, lower actual data throughput rate.
FCC Statement
This equipment has been tested and found to comply with the limits for a Class B digital device, pursuant to Part 15 of the FCC Rules. These limits are designed to provide reasonable protection against harmful interference in a residential installation. This equipment generates, uses and can radiate radio frequency energy and, if not installed and used in accordance with the instructions, may cause harmful interference to radio communications. However, there is no guarantee that interference will not occur in a particular installation. If this equipment does cause harmful interference to radio or television reception, which can be determined by turning the equipment off and on, the user is encouraged to try to correct the interference by one of the following measures:
- Reorient or relocate the receiving antenna.
- Increase the separation between the equipment and receiver.
- Connect the equipment into an outlet on a circuit different from that to which the receiver is connected.
- Consult the dealer or an experienced radio/TV technician for help.
This device complies with Part 15 of the FCC Rules. Operation is subject to the following two conditions:
- This device may not cause harmful interference, and
ii
- This device must accept any interference received, including interference that may cause undesired operation. FCC Caution: Any changes or modifications not expressly approved by the party responsible for compliance could void the user’s authority to operate this equipment.
The radio module has been evaluated under FCC Bulletin OET 65C (01-01) and found to be compliant to the requirements as set forth in CFR 47 Sections, 2.1093, and 15.247 (b) (4) addressing RF Exposure from radio frequency devices. This model meets the applicable government requirements for exposure to radio frequency waves.
Europe – EU Declaration of Conformity
Marking by the above symbol indicates compliance with the Essential Requirements of the R&TTE Directive of the European Union (1999/5/EC). This equipment meets the following conformance standards: EN300 328, EN301 489-17, EN60950-1
Europe – Declaration of Conformity in Languages of the European Community
| [lt] Lietuvių [Lithuanian] | Šiuo NETGEAR Inc. deklaruoja, kad šis Radiolan atitinka esminius reikalavimus ir kitas 1999/5/ EB Direktyvos nuostatas. |
|---|---|
| [nl] Nederlands [Dutch] | Hierbij verklaart NETGEAR Inc. dat het toestel Radiolan in overeenstemming is met de essentiële eisen en de andere relevante bepalingen van richtlijn 1999/5/EG. |
| [mt] Malti [Maltese] | Hawnhekk, NETGEAR Inc., jiddikjara li dan Radiolan jikkonforma mal-ħtigijiet essenzjali u ma provvedimenti ohrajn relevanti li hemm fid-Dirrettiva 1999/5/EC. |
| [hu] Magyar [Hungarian] | Alulírott, NETGEAR Inc. nyilatkozom, hogy a Radiolan megfelel a vonatkozó alapvető követelményeknek és az 1999/5/EC irányelv egyéb előírásainak. |
| [pl] Polski [Polish] | Niniejszym NETGEAR Inc. oświadcza, że Radiolan jest zgodny z zasadniczymi wymogami oraz pozosta³ymi stosownymi postanowieniami Dyrektywy 1999/5/EC. |
| [pt] Português [Portuguese] | NETGEAR Inc. declara que este Radiolan está conforme com os requisitos essenciais e outras disposições da Directiva 1999/5/CE. |
| [sl] Slovensko [Slovenian] | NETGEAR Inc. izjavlja, da je ta Radiolan v skladu z bistvenimi zahtevami in ostalimi relevantnimi določili direktive 1999/5/ES. |
| [sk] Slovensky [Slovak] | NETGEAR Inc. týmto vyhlasuje, že Radiolan spĺňa základné požiadavky a všetky príslušné ustanovenia Smernice 1999/5/ES. |
| [fi] Suomi [Finnish] | NETGEAR Inc. vakuuttaa täten että Radiolan tyyppinen laite on direktiivin 1999/5/EY oleellisten vaatimusten ja sitä koskevien direktiivin muiden ehtojen mukainen. |
| [sv] Svenska [Swedish] | Härmed intygar NETGEAR Inc. att denna Radiolan står I överensstämmelse med de väsentliga egenskapskrav och övriga relevanta bestämmelser som framgår av direktiv 1999/5/EG. |
| Íslenska [Icelandic] | Hér með lýsir NETGEAR Inc. yfir því að Radiolan er í samræmi við grunnkröfur og aðrar kröfur, sem gerðar eru í tilskipun 1999/5/EC. |
| [no] Norsk [Norwegian] | NETGEAR Inc. erklærer herved at utstyret Radiolan er i samsvar med de grunnleggende krav og øvrige relevante krav i direktiv 1999/5/EF. |
Bestätigung des Herstellers/Importeurs
Es wird hiermit bestätigt, daß das Wireless-G Router Model WGR614v9 gemäß der im BMPT-AmtsblVfg 243/1991 und Vfg 46/1992 aufgeführten Bestimmungen entstört ist. Das vorschriftsmäßige Betreiben einiger Geräte (z.B. Testsender) kann jedoch gewissen Beschränkungen unterliegen. Lesen Sie dazu bitte die Anmerkungen in der Betriebsanleitung.
Das Bundesamt für Zulassungen in der Telekommunikation wurde davon unterrichtet, daß dieses Gerät auf den Markt gebracht wurde und es ist berechtigt, die Serie auf die Erfüllung der Vorschriften hin zu überprüfen.
iv
Certificate of the Manufacturer/Importer
It is hereby certified that the Wireless-G Router Model WGR614v9 has been suppressed in accordance with the conditions set out in the BMPT-AmtsblVfg 243/1991 and Vfg 46/1992. The operation of some equipment (for example, test transmitters) in accordance with the regulations may, however, be subject to certain restrictions. Please see the notes in the operating instructions.
Federal Office for Telecommunications Approvals has been notified of the placing of this equipment on the market and has been granted the right to test the series for compliance with the regulations.
Voluntary Control Council for Interference (VCCI) Statement
This equipment is in the second category (information equipment to be used in a residential area or an adjacent area thereto) and conforms to the standards set by the Voluntary Control Council for Interference by Data Processing Equipment and Electronic Office Machines aimed at preventing radio interference in such residential areas.
When used near a radio or TV receiver, it may become the cause of radio interference.
Read instructions for correct handling.
MIC Compliance, “Class B” Equipment (Household purpose info/telecommunications equipment)
As this equipment has undergone EMC registration for household purposes, this product can be used in any area including residential areas.
Product and Publication Details
| Model Number: | WGR614v9 |
|---|---|
| Publication Date: | May 2008 |
| Product Family: | Wireless Router |
| Product Name: | Wireless-G Router Model WGR614v9 |
| Home or Business Product: | Home |
| Language: | English |
| Publication Part Number: | 202-10308-01 |
| Publication Version Number: | 1.1 |
vi
Contents
About This Manual
- Conventions, Formats, and Scope ........ xi
- How to Use This Manual ........ xii
- How to Print This Manual ........ xii
- Revision History ........ xiii
Chapter 1 Configuring Basic Connectivity
- Configuring Your Internet Connection Using the Smart Setup Wizard ........ 1-1
- Using the Setup Manual ........ 1-2
- Logging In to Your Wireless Router ........ 1-2
- Viewing and Configuring Basic ISP Settings ........ 1-5
Chapter 2 Safeguarding Your Network
- Choosing Appropriate Wireless Security ........ 2-1
- Recording Basic Wireless Settings Setup Information ........ 2-4
- Changing Wireless Security Settings ........ 2-5
- Viewing Basic Wireless Settings ........ 2-5
- Configuring WEP Wireless Security ........ 2-7
- Configuring WPA-PSK and WPA2-PSK Wireless Security ........ 2-9
- Viewing Advanced Wireless Settings ........ 2-10
- Restricting Wireless Access by MAC Address ........ 2-11
- Changing the Administrator Password ........ 2-14
- Backing Up Your Configuration ........ 2-15
- Understanding Your Firewall ........ 2-15
Chapter 3 Restricting Access From Your Network
- Content Filtering Overview ........ 3-1
- Blocking Access to Internet Sites ........ 3-1
- Blocking Access to Internet Services ........ 3-3
- Configuring a User-Defined Service ........ 3-4
- Blocking Services by IP Address Range ........ 3-5
- Scheduling Blocking ........ 3-5
- Viewing Logs of Web Access or Attempted Web Access ........ 3-7
Chapter 4 Customizing Your Network Settings
- Using the LAN IP Setup Options ........ 4-1
- Configuring a Device Name ........ 4-2
- Configuring LAN TCP/IP Setup Parameters ........ 4-2
- Using the Router as a DHCP Server ........ 4-2
- Using Address Reservation ........ 4-3
- Using a Dynamic DNS Service ........ 4-4
- Configuring the WAN Setup Options ........ 4-6
- Disabling the SPI Firewall ........ 4-6
- Setting Up a Default DMZ Server ........ 4-6
- Responding to a Ping on the Internet (WAN) Port ........ 4-7
- Setting the MTU Size ........ 4-7
- Configuring NAT Filtering ........ 4-8
- Configuring Static Routes ........ 4-8
- Wireless Repeating (Also Called WDS) ........ 4-10
- Wireless Repeating Function ........ 4-11
- Setting Up the Base Station ........ 4-12
- Setting Up a Repeater Unit ........ 4-13
Chapter 5 Fine-Tuning Your Network
- Allowing Inbound Connections to Your Network ........ 5-1
- How Your Computer Accesses a Remote Computer through Your Router ........ 5-2
- How Port Triggering Changes the Communication Process ........ 5-3
- How Port Forwarding Changes the Communication Process ........ 5-5
- How Port Forwarding Differs from Port Triggering ........ 5-6
- Configuring Port Forwarding to Local Servers ........ 5-6
- Adding a Custom Service ........ 5-7
- Editing or Deleting a Port Forwarding Entry ........ 5-8
- Configuring Port Triggering ........ 5-9
- Using Universal Plug and Play ........ 5-12
viii Contents
- Optimizing Wireless Performance ........ 5-13
- Using WMM for Wireless Multimedia Applications ........ 5-14
- Changing the MTU Size ........ 5-15
- Overview of Home and Small Office Networking Technologies ........ 5-16
- Assessing Your Speed Requirements ........ 5-17
Chapter 6 Using Network Monitoring Tools
- Viewing Wireless Router Status Information ........ 6-1
- Viewing a List of Attached Devices ........ 6-5
- Managing the Configuration File ........ 6-6
- Backing Up and Restoring the Configuration ........ 6-6
- Erasing the Configuration ........ 6-7
- Upgrading the Router Software ........ 6-7
- Upgrading Automatically to New Router Software ........ 6-9
- Upgrading Manually to New Router Software ........ 6-10
- Enabling Remote Management Access ........ 6-11
Chapter 7 Troubleshooting
- Troubleshooting Quick Tips ........ 7-1
- Troubleshooting Basic Functions ........ 7-3
- Troubleshooting the Web Configuration Interface ........ 7-4
- Troubleshooting the Internet Connection ........ 7-5
- Troubleshooting a Network Using the Ping Utility ........ 7-7
- Testing the LAN Path to Your Router ........ 7-7
- Testing the Path from Your Computer to a Remote Device ........ 7-8
- Problems with Date and Time ........ 7-9
- Solving Wireless Connection Problems ........ 7-9
- Using Your Wireless Card Setup Program ........ 7-9
- Setting Up and Testing Basic Wireless Connectivity ........ 7-10
- Restoring the Default Configuration and Password ........ 7-13
Appendix A Technical Specifications
Appendix B Related Documents
Index
Contents ix
x Contents
About This Manual
The user manual provides information for configuring the features of the NETGEAR® Wireless-G Router Model WGR614v9 beyond initial configuration settings. Initial configuration instructions can be found in the . You should have basic to intermediate computer and Internet skills.
Conventions, Formats, and Scope
The conventions, formats, and scope of this manual are described in the following paragraphs:
- Typographical conventions. This manual uses the following typographical conventions:
- Formats. This manual uses the following formats to highlight special messages:
Note: This format is used to highlight information of importance or special interest.
Tip: This format is used to highlight a procedure that will save time or resources.
Warning: Ignoring this type of note might result in a malfunction or damage to the equipment, a breach of security, or a loss of data.
Danger: This is a safety warning. Failure to take heed of this notice might result in personal injury or death.
xi
Wireless-G Router WGR614v9 Reference Manual
- Scope. This manual is written for the Wireless-G Router according to these specifications:
| Product Version | Wireless-G Router Model WGR614v9 |
|---|---|
| Manual Publication Date | May 2008 |
For more information about network, Internet, firewall, and VPN technologies, click the links to the NETGEAR website in Appendix B, “Related Documents.”
Note: Product updates are available on the NETGEAR, Inc. website at http://www.netgear.com/support.
How to Use This Manual
The HTML version of this manual includes the following:
- Buttons,
>and<, for browsing forward or backward through the manual one page at a time. - A
≡button that displays the table of contents and anibutton that displays an index. Double-click a link in the table of contents or index to navigate directly to where the topic is described in the manual. - A
?button to access the full NETGEAR, Inc. online knowledge base for the product model. - Links to PDF versions of the full manual and individual chapters.
How to Print This Manual
To print this manual, you can choose one of the following options, according to your needs.
- Printing a page from HTML. Each page in the HTML version of the manual is dedicated to a major topic. Select File > Print from the browser menu to print the page contents.
- Printing from PDF. Your computer must have the free Adobe Acrobat Reader installed for you to view and print PDF files. The Acrobat Reader is available on the Adobe website at http://www.adobe.com.
- Printing a PDF chapter. Use the PDF of This Chapter link at the top left of any page.
xii
About This Manual
- Click the PDF of This Chapter link at the top left of any page in the chapter you want to print. The PDF version of the chapter you were viewing opens in a browser window.
- Click the print icon in the upper left of your browser window. – Printing a PDF version of the complete manual. Use the Complete PDF Manual link at the top left of any page.
- Click the Complete PDF Manual link at the top left of any page in the manual. The PDF version of the complete manual opens in a browser window.
- Click the print icon in the upper left of your browser window.
 Tip: If your printer supports printing two pages on a single sheet of paper, you can save paper and printer ink by selecting this feature.
Revision History
NETGEAR, Inc. is constantly searching for ways to improve its products and documentation. The following table indicates any changes that might have been made since the Wireless-G Router was introduced.
Table 2-1. Publication Revision History
About This Manual xiii
xiv About This Manual
Chapter 1
Configuring Basic Connectivity
This chapter describes the settings for your Internet connection and your wireless local area network (LAN) connection. When you perform the initial configuration of your wireless router using the Resource CD as described in the , these settings are specified automatically for you. This chapter provides further details about these connectivity settings, as well as instructions on how to log in to the router for further configuration.
Note: NETGEAR recommends using the Smart Wizard™ on the Resource CD for initial configuration, as described in the .
This chapter includes the following sections:
- “Configuring Your Internet Connection Using the Smart Setup Wizard” on page 1-1
- “Using the Setup Manual” on page 1-2”
- “Logging In to Your Wireless Router” on page 1-2
- “Viewing and Configuring Basic ISP Settings” on page 1-5
Configuring Your Internet Connection Using the Smart Setup Wizard
You can manually configure your Internet connection using the Basic Settings screen, or you can allow the Smart Setup Wizard to determine your Internet Service Provider (ISP) configuration.
The Smart Setup Wizard searches your Internet connection for servers and protocols to determine your ISP configuration. This feature is not the same as the Smart Wizard configuration assistant that appears only when the router is in its factory default state. To use the Smart Setup Wizard to assist with configuration or to verify the Internet connection settings:
- From the top of the main menu of the browser interface, click Setup Wizard.
- Click Next to proceed. Enter your ISP settings, as needed.
- At the end of the Setup Wizard, click Test to verify your Internet connection. If you have trouble connecting to the Internet, see Chapter 7, “Troubleshooting.”
Using the Setup Manual
For first-time installation of your wireless router, refer to the . The Setup Manual explains how to launch the NETGEAR Smart Wizard on the Resource CD to step you through the procedure to connect your router, modem, and computers. The Smart Wizard will assist you in configuring your wireless settings and enabling wireless security for your network. After initial configuration using the Setup Manual, you can use the information in this User Manual to configure additional features of your wireless router.
For installation instructions in a language other than English, refer to the language options on the Resource CD.
Logging In to Your Wireless Router
When the wireless router is connected to your network, you can access and configure the router using your browser.
To access the Web Configuration Manager:
- Connect to the wireless router by typing http://www.routerlogin.net or the router's LAN IP address (the default is 192.168.1.1) in the address field of your browser, and then press Enter. A login window opens:
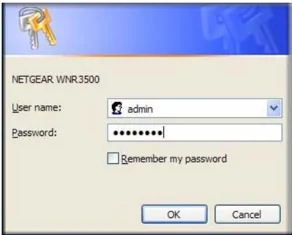
Figure 1-1
Configuring Basic Connectivity
Tip: You can connect to the wireless router by typing either of these URLs in the address field of your browser, and then pressing Enter:
If these URLs do not work, you must type the IP address of the router, for example, http://www.192.168.1.1.
- Enter admin for the router user name and your password (or the default, password). For information about how to change the password, see “Changing the Administrator Password” on page 2-14.
Note: The router user name and password are not the same as any other user name or password you might use to log in to your Internet connection.
The Checking for Firmware Updates screen appears unless you previously cleared the Check for Updated Firmware Upon Log-in check box.
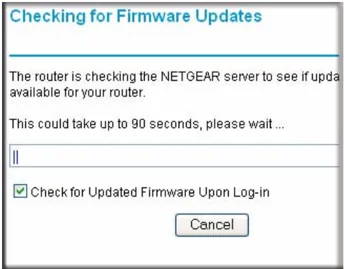
Figure 1-2
If the router discovers a newer version of software, you are asked if you want to upgrade to the new software (see “Upgrading the Router Software” on page 6-7 for details). If no new firmware is available, the no new firmware available message displays.
- In the main menu on the left, select Basic Settings under Setup. The Basic Settings screen displays showing the wireless router’s home page and suggested default settings.
Configuring Basic Connectivity
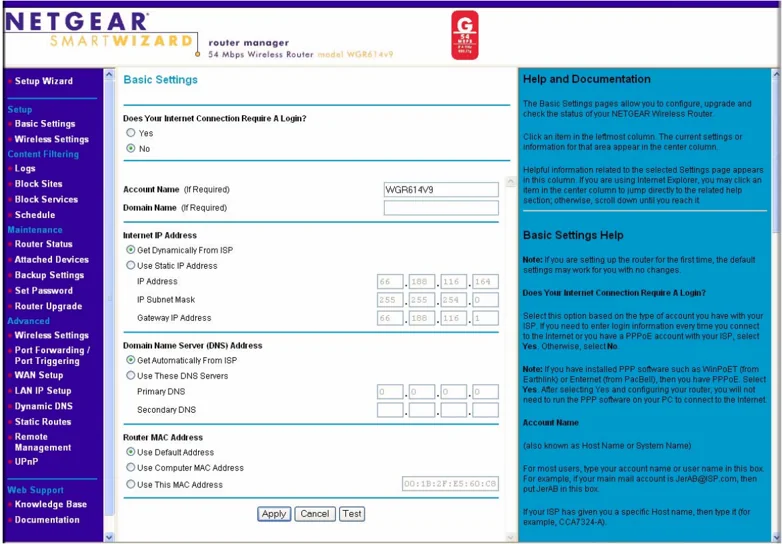
Figure 1-3
Note: If the Check for New Version Upon Log-in check box is selected, the home page is the Router Upgrade screen. Otherwise, it is the Basic Settings screen.
If the wireless router is connected to the Internet, you can select Knowledge Base or Documentation under Web Support in the main menu to view support information or the documentation for the wireless router.
If you do not click Logout, the wireless router will wait for 5 minutes after no activity before it automatically logs you out.
Configuring Basic Connectivity
Viewing and Configuring Basic ISP Settings
Settings related to your Internet service are specified in the Basic Settings screen. To access the Basic Settings screen, from the main menu of the router’s Web Configuration Interface, under Setup, select Basic Settings. The content you see in the Basic Settings screen depends on whether your ISP requires that you log in with a user name and password for Internet access.
ISP does not require login
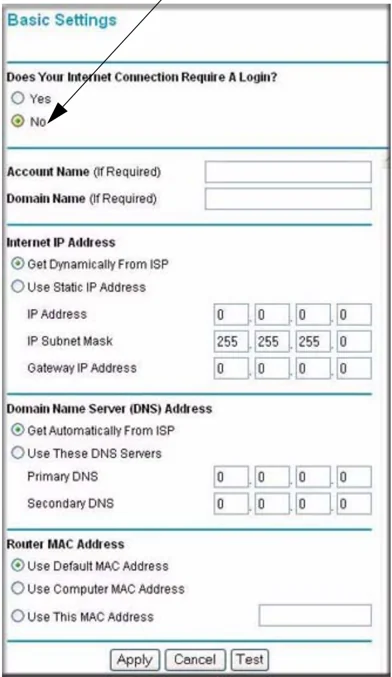
Figure 1-4
- No login required by ISP. If no login is required by your ISP, the following settings appear in the Basic Settings screen.
Configuring Basic Connectivity v1.1, May 2008 1-5
– Account Name (might also be called Host Name). The account name is provided to the ISP during a DHCP request from your router. In most cases, this setting is not required, but some ISPs require it for access to ISP services such as mail or news servers.
– Domain Name. The domain name is provided by your router to computers on your LAN when the computers request DHCP settings from your router. In most cases, this settings is not required.
– Internet IP Address. Determines how your router obtains an IP address for Internet access.
• If your ISP assigns an IP address dynamically (by DHCP), select Get Dynamically From ISP.
• If your ISP has assigned you a permanent, fixed (static) IP address for your computer, select Use Static IP Address. Enter the IP address that your ISP assigned. Also, enter the subnet mask and the gateway IP address. The gateway is the ISP’s router to which your router will connect.
– Domain Name Server (DNS) Address. If you know that your ISP does not automatically transmit DNS addresses to the router during login, select Use These DNS Servers, and enter the IP address of your ISP’s primary DNS server. If a secondary DNS server address is available, enter it also.
Note: If you enter or change a DNS address, restart the computers on your network so that these settings take effect.
– Router MAC Address. This section determines the Ethernet MAC address that the router will use on the Internet port. Typically, you would leave Use Default Address selected. However, some ISPs (especially cable modem providers) register the Ethernet MAC address of the network interface card in your computer when your account is first opened. They then accept only traffic from the MAC address of that computer. This feature allows your router to masquerade as that computer by “cloning” or “spoofing” its MAC address.
To change the MAC address, select one of the following methods:
• Select Use Computer MAC Address. The router will then capture and use the MAC address of the computer that you are now using. You must be using the one computer that is allowed by the ISP.
• Select Use This MAC Address, and type it in here.
Configuring Basic Connectivity
If a login is required by your ISP, the following settings appear in the Basic Settings screen:
ISP does require login
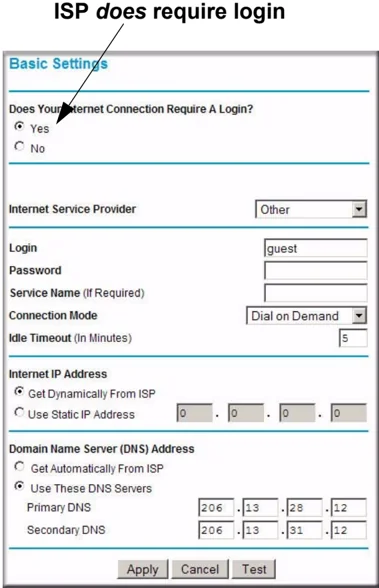
Figure 1-5
- Does Your Internet Connection Require A Login? If you usually must use a login program such as WinPOET to access the Internet, your Internet connection requires a login. After you select Yes, the Basic Settings screen displays.
Note: After you finish setting up your router, you will no longer need to launch the ISP’s login program on your computer to access the Internet. When you start an Internet application, your router will automatically log you in.
— Internet Service Provider. This drop-down list contains a few ISPs that need special protocols for connection. The list includes: * PPTP (Point to Point Tunneling Protocol), used primarily in Austrian DSL services
Configuring Basic Connectivity v1.1, May 2008 1-7
- Telstra Bigpond, an Australian residential cable modem service
Note: The Telstra Bigpond setting is only for older cable modem service accounts still requiring a Bigpond login utility. Telstra has discontinued this type of account. Those with Telstra DSL accounts and newer cable modem accounts should select No for Does Your Internet Connection Require a Login.
- Other, which selects PPPoE (Point to Point Protocol over Ethernet), the protocol used by most DSL services worldwide.
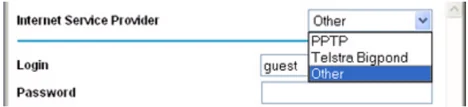
Figure 1-6
Note: Not all ISPs are listed here. The ones on this list have special requirements.
– Login and Password. This is the user name and password provided by your ISP. This name and password are used to log in to the ISP server. – Service Name. If your connection is capable of connecting to multiple Internet services, this setting specifies which service to use. – Connection Mode. This drop-down list (shown in Figure 1-5 on page 1-7) selects when the router will connect to and disconnect from the Internet. The list includes: * Always On. The router logs in to the Internet immediately after booting and never disconnects. * Dial on Demand. The router logs in only when outgoing traffic is present and logs out after the idle time-out. * Manually Connect. The router logs in or logs out only when the user clicks Connect or Disconnect in the Router Status screen. – Idle Timeout. Your Internet connection is logged out if there is no data transfer during the specified time interval.
1-8 Configuring Basic Connectivity
Domain Name Server (DNS) Address. If you know that your ISP does not automatically transmit DNS addresses to the router during login, select Use These DNS Servers, and enter the IP address of your ISP’s primary DNS server. If a secondary DNS server address is available, enter it also.
Note: If you enter or change a DNS address, restart the computers on your network so that these settings take effect.
Configuring Basic Connectivity
Configuring Basic Connectivity