Naming your Computer
To name your computer, please follow these directions:
In Windows XP:
- Click Start (in the lower left corner of the screen)
- Right-click on My Computer
- Select Properties and click

- Select the Computer Name Tab in the System Properties window.
You may enter a Computer description if you wish, this field is optional.
To rename the computer and join a domain,
- Click Change

Naming your Computer
- In this window, enter the Computer name.
- Select Workgroup and enter the name of the Workgroup.
- All computers on your network must have the same Workgroup name.
- Click OK

Checking the IP Address in Windows XP/2000
Go to Start > All Programs > Accessories > Command Prompt

Checking the IP Address in Windows XP/2000
Type Command

Click OK
Checking the IP Address in Windows XP/2000
Type ipconfig /all at the prompt. Click Enter. All the configuration settings are displayed as shown below.

Checking the IP Address in Windows XP/2000
Type ipconfig /renew at the prompt to get a new IP Address. Click Enter. The new IP Address is shown below.

(Windows 98/ME users: go to Start > Run. Type Command. Type winipcfg at the prompt. Click Release and Renew to obtain a new IP Address.)
Assigning a Static IP Address
Note: Residential Gateways/Broadband Routers will automatically assign IP Addresses to the computers on the network, using DHCP (Dynamic Host Configuration Protocol) technology. If you are using a DHCP-capable Gateway/Router you will not need to assign Static IP Addresses.
If you are not using a DHCP capable Gateway/Router, or you need to assign a Static IP Address, please follow these instructions:
- Go to Start
- Double-click on Control Panel

Assigning a Static IP Address
- Double-click on Network Connections

-
Right-click on Local Area Connections.
-
Double-click Properties

Assigning a Static IP Address
- Highlight Internet Protocol(TCP/IP)
- Click Properties

-
Select Use the following IP address in the Internet Protocol (TCP/IP) Properties window (shown below.)
-
Input your IP address and subnet mask. (The IP Addresses on your network must be within the same range. For example, if one computer has an IP Address of 192.168.0.2, the other computers should have IP Addresses that are sequential, like 192.168.0.3 and 192.168.0.4. The subnet mask must be the same for all the computers on the network.)
-
Input your DNS server addresses. (Note: If you are entering a DNS server, you must enter the IP Address of the Default Gateway.)

The DNS server information will be provided by your ISP (Internet Service Provider.)
Adding and Sharing Printers in Windows XP
After you have run the Network Setup Wizard on all the computers in your network (please see the Network Setup Wizard section at the beginning of Networking Basics,) you can use the Add Printer Wizard to add or share a printer on your network.
Whether you want to add a local printer (a printer connected directly to one computer,) share an LPR printer (a printer connected to a print server) or share a network printer (a printer connected to your network through a Gateway/Router,) use the Add Printer Wizard, you can find the directions below:
First, make sure that you have run the Network Setup Wizard on all of the computers on your network.
We will show you 3 ways to use the Add Printer Wizard
- Adding a local printer
- Sharing an network printer
- Sharing an LPR printer
Adding a local printer
(A printer connected directly to a computer)
A printer that is not shared on the network and is connected directly to one computer is called a local printer. If you do not need to share your printer on a network, follow these directions to add the printer to one computer.
Adding a local printer
- Go to Start> Printers and Faxes

- Click on Add a printer

Adding a local printer
- Click Next

- Select Local printer attached to this computer
- (Deselect Automatically detect and install my Plug and Play printer if it has been selected.)
- Click Next
- Select Use the following port:
- From the pull-down menu select the correct port for your printer
(Most computers use the LPT1: port, as shown in the illustration.)


- Click Next
Adding a local printer
- Select and highlight the correct driver for your printer.
- Click Next
*(If the correct driver is not displayed, insert the CD or floppy disk that came with your printer and click Have Disk.)

- At this screen, you can change the name of the printer (optional.)

- Select Yes, to print a test page. A successful printing will confirm that you have chosen the correct driver.
- Click Next

Adding a local printer
This screen gives you information about your printer.

Click Finish
When the test page has printed,

Click OK
Adding a local printer
- Go to Start> Printers and Faxes
A successful installation will display the printer icon as shown at right.
You have successfully added a local printer.

Sharing a network printer
After you have run the Network Setup Wizard on all the computers on your network, you can run the Add Printer Wizard on all the computers on your network. Please follow these directions to use the Add Printer Wizard to share a printer on your network:
- Go to Start> Printer and Faxes

Sharing a network printer
- Click on Add a Printer
Printer Tasks Add a printer Set up faxing Start the Add Printer Wizard, which helps you install a printer.
- Click Next
Add Printer Wizard
Welcome to the Add Printer Wizard
This wizard helps you install a printer or make printer connections.
If you have a Plug and Play printer that connects through a USB port (or any other hot pluggable port, such as IEEE 1394, infrared, and so on), you do not need to use this wizard. Click Cancel to close the wizard, and then plug the printer's cable into your computer or point the printer toward your computer's infrared port, and turn the printer on. Windows will automatically install the printer for you.
To continue, click Next.
< Back Next > Cancel
- Select Network Printer
- Click Next
Add Printer Wizard
Local or Network Printer The wizard needs to know which type of printer to set up.
Select the option that describes the printer you want to use:
○ Local printer attached to this computer ☐ Automatically detect and install my Plug and Play printer ● A network printer, or a printer attached to another computer
To set up a network printer that is not attached to a print server, use the "Local printer" option.
< Back Next > Cancel


Sharing a network printer
-
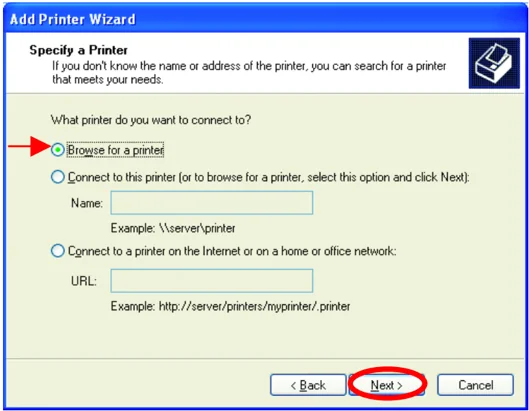
Select Browse for a printer
-
Click Next
-
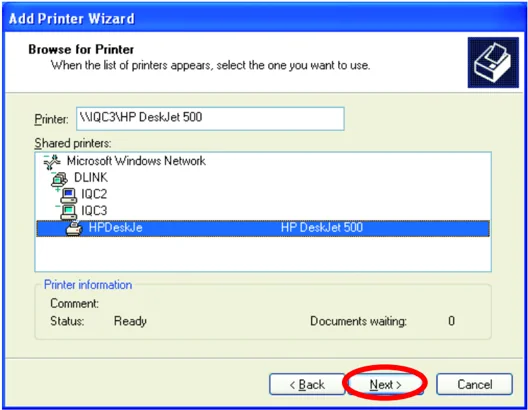
Select the printer you would like to share.
-
Click Next
-
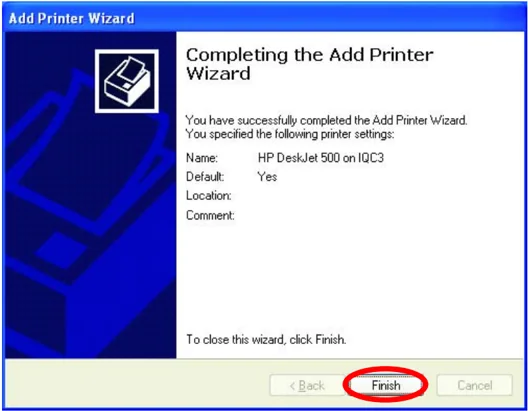
Click Finish
Sharing a network printer
To check for proper installation:
- Go to Start> Printers and Faxes

The printer icon will appear at right, indicating proper installation.
You have completed adding the printer.
To share this printer on your network:
- Remember the printer name
- Run the Add Printer Wizard on all the computers on your network.
- Make sure you have already run the Network Setup Wizard on all the network computers.
After you run the Add Printer Wizard on all the computers in the network, you can share the printer.
Sharing an LPR printer
To share an LPR printer (using a print server,) you will need a Print Server such as the DP-101P+. Please make sure that you have run the Network Setup Wizard on all the computers on your network. To share an LPR printer, please follow these directions:
- Go to Start> Printers and Faxes
- Click on Add a Printer
The screen to the right will display.
- Click Next

- Select Local printer...

- Click Next
Sharing an LPR printer
- Select Create a new port
- From the pull-down menu, select Standard TCP/IP Port, as shown.
- Click Next
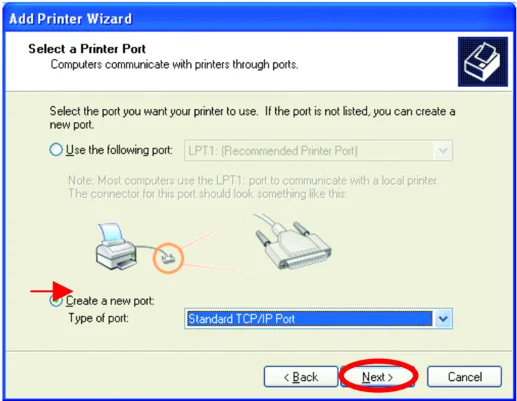
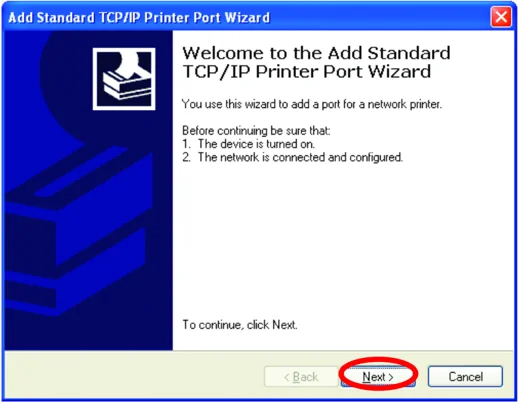
- Please read the instructions on this screen.
- Click Next
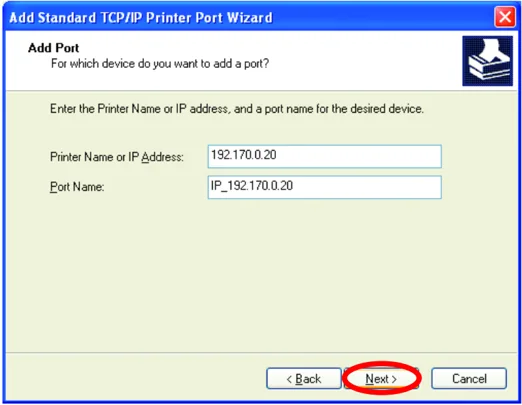
- Enter the Printer IP Address and the Port Name, as shown.
- Click Next
Sharing an LPR printer
- In this screen, select Custom.
- Click Settings

- Enter the Port Name and the Printer Name or IP Address.
- Select LPR
- Enter a Queue Name (if your Print-Server/ Gateway has more than one port, you will need a Queue name.)
- Click OK

Sharing an LPR printer
-
This screen will show you information about your printer.
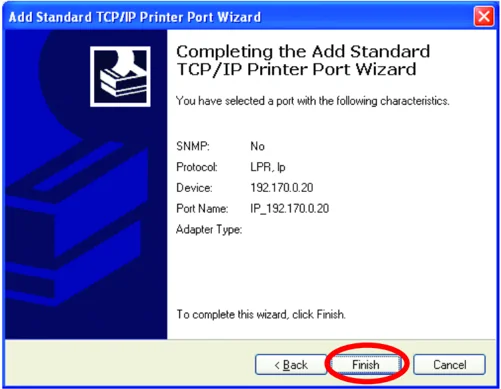
-
Click Finish
-
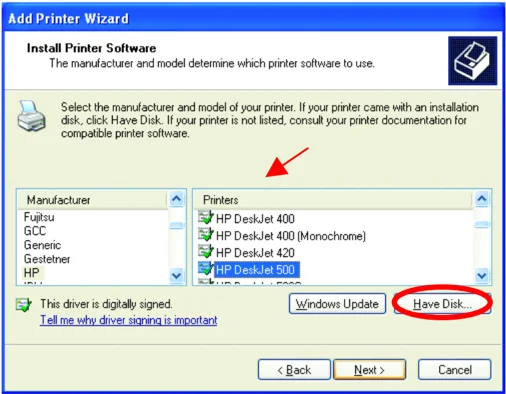
Select the printer you are adding from the list of Printers.
-
Insert the printer driver disk that came with your printer.
-
Click Have Disk
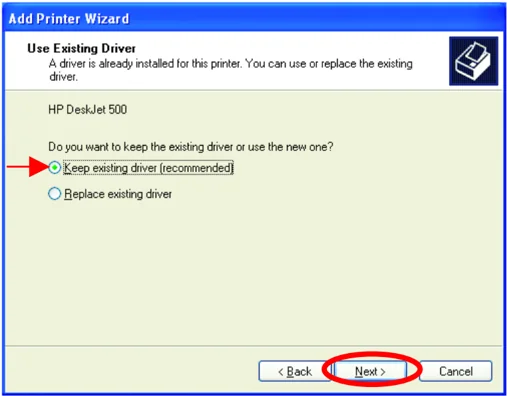
If the printer driver is already installed,
- Select Keep existing driver
- Click Next
Sharing an LPR printer
- You can rename your printer if you choose. It is optional.
Please remember the name of your printer. You will need this information when you use the Add Printer Wizard on the other computers on your network.
- Click Next

-
Select Yes, to print a test page.
-
Click Next

This screen will display information about your printer.
-
Click Finish to complete the addition of the printer.
-
Please run the Add Printer Wizard on all the computers on your network in order to share the printer.

Note: You must run the Network Setup Wizard on all the computers on your network before you run the Add Printer Wizard.
Other Tasks
For help with other tasks in home or small office networking, see Using the Shared Documents folder and Sharing files and folders in the Help and Support Center in Microsoft Windows XP.
Technical Specifications
Standards
- IEEE 802.3 10Base-T Ethernet
- IEEE 802.3u 100Base-TX Fast Ethernet
- IEEE 802.3 Nway Auto-Negotiation
VPN Pass Through / Multi-Sessions
- PPTP
- L2TP
- IPSec
Device Management Web-Based – requires at least Microsoft Internet Explorer v5 or later, Netscape Navigator v4 or later, or other Java-enabled browsers.
Media Access Control CMSA/CA with ACK
LEDS
- Power
- WAN
- Local Network – 10/100
Operating Temperature 32F to 131F (0C to 55C)
Humidity 95% maximum (non-condensing)
Power Input External power Supply DC 5V, 2.0A
Safety & Emissions
- FCC
- UL
Dimensions
- L = 5.6in (142mm)
- W = 4.3in (109mm)
- H = 1.2in (31mm)
Weight 0.44 lbs (200g)
Warranty One Year
Technical Support
You can find software updates and user documentation on the D-Link website.
D-Link provides free technical support for customers within the United States and within Canada for the duration of the warranty period on this product.
U.S. and Canadian customers can contact D-Link Technical Support through our website, or by phone.
Tech Support for customers within the United States:
D-Link Technical Support over the Telephone: (877) 453-5465 24 hours a day, seven days a week.
D-Link Technical Support over the Internet: http://support.dlink.com email:support@dlink.com
Tech Support for customers within Canada:
D-Link Technical Support over the Telephone: (800) 361-5265 Monday to Friday 8:30am to 9:00pm EST
D-Link Technical Support over the Internet: http://support.dlink.ca email:support@dlink.ca
Warranty
D-Link Systems, Inc. (“D-Link”) provides this 1-Year warranty for its product only to the person or entity who originally purchased the product from:
- D-Link or its authorized reseller or distributor.
- Products purchased and delivered within the fifty United States, the District of Columbia, US Possessions or Protectorates, US Military Installations, addresses with an APO or FPO.
1-Year Limited Hardware Warranty: D-Link warrants that the hardware portion of the D-Link products described below (“Hardware”) will be free from material defects in workmanship and materials from the date of original retail purchase of the Hardware, for the period set forth below applicable to the product type (“Warranty Period”).
1-Year Limited Warranty for the Product(s) is defined as follows
- Hardware (excluding power supplies and fans)
- Spare parts and spare kits Ninety (90) days.
D-Link’s sole obligation shall be to repair or replace the defective Hardware at no charge to the original owner. Such repair or replacement will be rendered by D-Link at an Authorized D-Link Service Office. The replacement Hardware need not be new or of an identical make, model or part; D-Link may in its discretion replace the defective Hardware (or any part thereof) with any reconditioned product that D-Link reasonably determines is substantially equivalent (or superior) in all material respects to the defective Hardware. The Warranty Period shall extend for an additional ninety (90) days after any repaired or replaced Hardware is delivered. If a material defect is incapable of correction, or if D-Link determines in its sole discretion that it is not practical to repair or replace the defective Hardware, the price paid by the original purchaser for the defective Hardware will be refunded by D-Link upon return to D-Link of the defective Hardware. All Hardware (or part thereof) that is replaced by D-Link, or for which the purchase price is refunded, shall become the property of D-Link upon replacement or refund.
Limited Software Warranty: D-Link warrants that the software portion of the product (“Software”) will substantially conform to D-Link’s then current functional specifications for the Software, as set forth in the applicable documentation, from the date of original delivery of the Software for a period of ninety (90) days (“Warranty Period”), if the Software is properly installed on approved hardware and operated as contemplated in its documentation. D-Link further warrants that, during the Warranty Period, the magnetic media on which D-Link delivers the Software will be free of physical defects. D-Link’s sole obligation shall be to replace the non-conforming Software (or defective media) with software that substantially conforms to D-Link’s functional specifications for the Software. Except as otherwise agreed by D-Link in writing, the replacement Software is provided only to the original licensee, and is subject to the terms and conditions of

the license granted by D-Link for the Software. The Warranty Period shall extend for an additional ninety (90) days after any replacement Software is delivered. If a material non-conformance is incapable of correction, or if D-Link determines in its sole discretion that it is not practical to replace the non-conforming Software, the price paid by the original licensee for the non-conforming Software will be refunded by D-Link; provided that the non-conforming Software (and all copies thereof) is first returned to D-Link. The license granted respecting any Software for which a refund is given automatically terminates.
What You Must Do For Warranty Service:
Submitting A Claim. Any claim under this limited warranty must be submitted in writing before the end of the Warranty Period to an Authorized D-Link Service Office.
- The customer must submit as part of the claim a written description of the Hardware defect or Software nonconformance in sufficient detail to allow D-Link to confirm the same.
- The original product owner must obtain a Return Material Authorization (RMA) number from the Authorized D-Link Service Office and, if requested, provide written proof of purchase of the product (such as a copy of the dated purchase invoice for the product) before the warranty service is provided.
- After an RMA number is issued, the defective product must be packaged securely in the original or other suitable shipping package to ensure that it will not be damaged in transit, and the RMA number must be prominently marked on the outside of the package.
- The customer is responsible for all shipping charges to and from D-Link (No CODs allowed). Products sent COD will become the property of D-Link Systems, Inc. Products should be fully insured by the customer and shipped to D-Link Systems Inc., 17595 Mt. Herrrmann, Fountain Valley, CA 92708.
D-Link may reject or return any product that is not packaged and shipped in strict compliance with the foregoing requirements, or for which an RMA number is not visible from the outside of the package. The product owner agrees to pay D-Link's reasonable handling and return shipping charges for any product that is not packaged and shipped in accordance with the foregoing requirements, or that is determined by D-Link not to be defective or non-conforming.
What Is Not Covered: This limited warranty provided by D-Link does not cover: Products that have been subjected to abuse, accident, alteration, modification, tampering, negligence,
misuse, faulty installation, lack of reasonable care, repair or service in any way that is not contemplated in the documentation for the product, or if the model or serial number has been altered, tampered with, defaced or removed; Initial installation, installation and removal of the product for repair, and shipping costs; Operational adjustments covered in the operating manual for the product, and normal maintenance; Damage that occurs in shipment, due to act of God, failures due to power surge, and cosmetic damage; and Any hardware, software, firmware or other products or services provided by anyone other than D-Link.
Disclaimer of Other Warranties: EXCEPT FOR THE 1-YEAR LIMITED WARRANTY SPECIFIED HEREIN, THE PRODUCT IS PROVIDED “AS-IS” WITHOUT ANY WARRANTY OF ANY KIND INCLUDING, WITHOUT LIMITATION, ANY WARRANTY OF MERCHANTABILITY, FITNESS FOR A PARTICULAR PURPOSE AND NON-INFRINGEMENT. IF ANY IMPLIED WARRANTY CANNOT BE DISCLAIMED IN ANY TERRITORY WHERE A PRODUCT IS SOLD, THE DURATION OF SUCH IMPLIED WARRANTY SHALL BE LIMITED TO NINETY (90) DAYS. EXCEPT AS EXPRESSLY COVERED UNDER THE LIMITED WARRANTY PROVIDED HEREIN, THE ENTIRE RISK AS TO THE QUALITY, SELECTION AND PERFORMANCE OF THE PRODUCT IS WITH THE PURCHASER OF THE PRODUCT.
Limitation of Liability: TO THE MAXIMUM EXTENT PERMITTED BY LAW, D-LINK IS NOT LIABLE UNDER ANY CONTRACT, NEGLIGENCE, STRICT LIABILITY OR OTHER LEGAL OR EQUITABLE THEORY FOR ANY LOSS OF USE OF THE PRODUCT, INCONVENIENCE OR DAMAGES OF ANY CHARACTER, WHETHER DIRECT, SPECIAL, INCIDENTAL OR CONSEQUENTIAL (INCLUDING, BUT NOT LIMITED TO, DAMAGES FOR LOSS OF GOODWILL, WORK STOPPAGE, COMPUTER FAILURE OR MALFUNCTION, LOSS OF INFORMATION OR DATA CONTAINED IN, STORED ON, OR INTEGRATED WITH ANY PRODUCT RETURNED TO D-LINK FOR WARRANTY SERVICE) RESULTING FROM THE USE OF THE PRODUCT, RELATING TO WARRANTY SERVICE, OR ARISING OUT OF ANY BREACH OF THIS LIMITED WARRANTY, EVEN IF D-LINK HAS BEEN ADVISED OF THE POSSIBILITY OF SUCH DAMAGES. THE SOLE REMEDY FOR A BREACH OF THE FOREGOING LIMITED WARRANTY IS REPAIR, REPLACEMENT OR REFUND OF THE DEFECTIVE OR NON-CONFORMING PRODUCT.
GOVERNING LAW: This 1-Year Warranty shall be governed by the laws of the state of California. Some states do not allow exclusion or limitation of incidental or consequential damages, or limitations on how long an implied warranty lasts, so the foregoing limitations and exclusions may not apply. This limited warranty provides specific legal rights and the product owner may also have other rights which vary from state to state.
Trademarks Copyright® 2002 D-Link Corporation. Contents subject to change without prior notice. D-Link is a registered trademark of D-Link Corporation/D-Link Systems, Inc. All other trademarks belong to their respective proprietors.
Copyright Statement No part of this publication may be reproduced in any form or by any means or used to make any derivative such as translation, transformation, or adaptation without permission from D-Link Corporation/D-Link Systems Inc., as stipulated by the United States Copyright Act of 1976.
CE Mark Warning This is a Class B product. In a domestic environment, this product may cause radio interference, in which case the user may be required to take adequate measures.
FCC Statement
This equipment has been tested and found to comply with the limits for a Class B digital device, pursuant to part 15 of the FCC Rules. These limits are designed to provide reasonable protection against harmful interference in a residential installation. This equipment generates, uses and can radiate radio frequency energy and, if not installed and used in accordance with the instructions, may cause harmful interference to radio communication. However, there is no guarantee that interference will not occur in a particular installation. If this equipment does cause harmful interference to radio or television reception, which can be determined by turning the equipment off and on, the user is encouraged to try to correct the interference by one or more of the following measures:
• Reorient or relocate the receiving antenna.
• Increase the separation between the equipment and receiver.
• Connect the equipment into an outlet on a circuit different from that to which the receiver is connected.
Consult the dealer or an experienced radio/TV technician for help.
Rev. 101404
Version 206